MECHAYARD
YARD OPEN
BUILDS / ONE CAR, MANY LIVES / VOL 4 · LFX NC
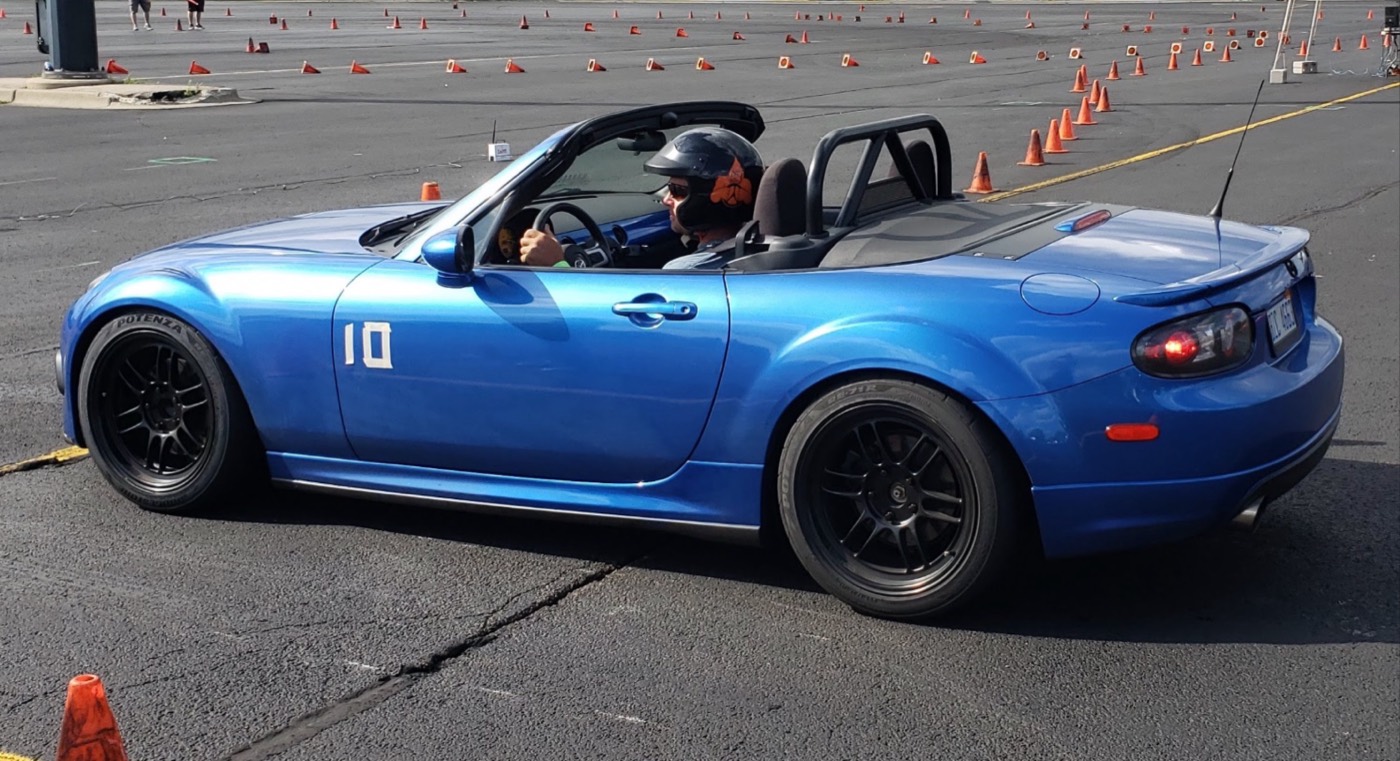
The LFX-swapped NC Miata mid-run at an autocross
BAY 02 · FOUR WHEELS2018 – 2020VOL 4 OF 4

LFX NC

A stock GM 3.6 V6, six-speed and diff from a Camaro, in an NC Miata that still drives like it left the factory that way.

ENGINE
GM LFX 3.6 L V62015 Camaro, 2,700 miles, stock
REDLINE
7,200 rpmabout 270 whp expected
GEARBOX
Camaro MV5 6-speedLuk OE clutch and flywheel
DIFF
Camaro SS, 3.27in a modified NC subframe
WEIGHT
2,660 lb+110 lb over the turbo car
SPENT
$13,434$8,500 of old parts sold
TIMELINE
Jan – Aug 2018most of it in 10-hour days from June
KEPT / LOST
Power steeringno A/C, no ABS

This car had already had two years of bolt-ons, a Cosworth supercharger and then a BEGi turbo. The turbo made about 270 wheel horsepower at 15 psi, and it ate a gearbox every two years and one differential with an OS Giken in it. I wanted parts built for the power.

Owners of LS-swapped NCs talked me into the V6 instead of a V8: it revs higher, the gearbox is better, the power suits the chassis and it costs less. Nobody else at the autocross had one either.

I ordered most of the swap parts from V8 Roadsters. They are well made, but it is not a kit. Nothing came with instructions, and most of it needed fabrication to fit.

“So freaking MEGA! All the hassle was worth it. This car feels as if it came this way. The power matches the chassis perfectly.”DRIVING IMPRESSIONS · AUG 2018
THE BUILD
CHAPTER 01 · JAN – JUN 2018

Out with the old

I started ordering in January and the last parts turned up in July. In between, the turbo setup came out and got sold, the front cross brace was cut out, and both subframes came off so they'd be ready when parts arrived.

The engine is a 2015 LFX from a Camaro with 2,700 miles on it. The differential is from a 2013 Camaro SS with 23,000 miles and 3.27 gears.

Out with the old: the whole NC drivetrain on a cart
Hey look at that. Nothing.
Front cross brace cut out
2015 LFX with 2,700 miles finds a new home
Camaro SS differential, 3.27 gears
Everything went across the scale
CHAPTER 02 · JUN – JUL 2018

Mounts, and a trans mount that didn't fit

The clutch and flywheel are Luk OE replacements with a hydraulic throwout bearing, and it drives like stock. The V8R motor mounts and front subframe arrived next. The mounts didn't sit flush on the block; spacers that should have been welded on came later, and gluing them on did not work.

THE SNAG

The V8R transmission mount could not work. The driveshaft bolts hit its support, and after an hour on the phone and a lot of photos there was no fix on offer.

THE FIX

I cut and re-made the mount myself, then set driveline alignment with a string. V8R later redesigned the part.

My solution, not endorsed by V8R
The problem: driveshaft bolts meet the support
Motor mount not sitting flush on the block
V8R mounts and front subframe arrive
Reworked mount in the tunnel
Working out driveline alignment
CHAPTER 03 · JUL 2018

Getting it to sit in the car

The engine went in and out many times. A lump on the firewall near the brake booster had to go from an outie to an innie. The steering rack went to V8R to have its tube rotated so the fittings clear the engine, and I ground a quarter inch off a mounting boss and a tab off the timing cover.

At the back, the V8R differential bracket is welded into the stock NC rear subframe. The rear cover mount uses the stock NC attachment points.

Diff in the modified NC subframe, right side up
How the engine went in and out, repeatedly
Firewall lump, marked for persuasion
Rack boss ground for timing cover clearance
V8R differential cover and mount
Diff bracket sitting in the upturned subframe before welding
CHAPTER 04 · JUL – AUG 2018

Fuel and brakes

I made the fuel lines from AN hose and fittings, which was much harder than expected. I printed vise jaws to hold the hose, and pressure-checked every line afterwards because leaks are easy to make. With ABS gone, the brake lines are all new in Cunifer, held by printed clips, and the empty sensor holes in the hubs got printed plugs.

THE SNAG

The Mazda proportioning valve used in MX-5 Cup cars put far too much bias on the front under autocross braking.

THE FIX

Short term: the worst front pads AutoZone had, which improved the afternoon runs. Long term: an adjustable valve or a standalone ABS unit.

New lines at the master cylinder and proportioning valve
Printed vise jaws for building AN lines
Cunifer brake line, easy to bend and flare
Printed line bracket with zip-tie insurance
Plugs for the old ABS sensor holes

FROM THE THREAD

john v: Non-DSC RX-8s have an ABS unit that only needs wheel speed sensors and 12 V, no CAN bus. The platforms are close enough that it should adapt to the NC.

CHAPTER 05 · JUL – AUG 2018

Three driveshafts

The first driveshaft was too short. A month later the second one was too long. A week after that the third was just right. The aluminium adapter on the transmission yoke is meant to come with a centering bushing that never arrived, so I printed one.

There is no PPF on this car. Launches at autocross feel the same as before.

The third driveshaft, and it fits
Printed centering bushing, in orange
Driveshaft number one arrives
CHAPTER 06 · AUG – SEP 2018

Gauges with a little Ferrari

I wanted gauges fed by the engine computer over CAN bus, with some pizzazz. I mocked up a layout in Photoshop, marked up the SpeedHut order page and sent both to V8R. The gauges arrived a couple of months later. The bracket came as a flat plate that needed bending, more fabrication and a wrap of carbon vinyl.

They're wired with Deutsch connectors for easy removal, and they need a switch to turn them off while flashing the ECU.

THE SNAG

The tach face has a V8 redline at 6,400 on a 7,200 rpm engine, and the digital fuel gauge asks the ECU for a signal it will never send.

THE FIX

A corrected tach face was promised. For fuel, a fuel pressure gauge and a 2-gallon RotoPax in the trunk.

Installed, on the road
Photoshop mock-up sent with the order
What arrived
Bracket bent, braced and wrapped
CHAPTER 07 · AUG 2018 – FEB 2019

Cooling and plumbing

GM offers a lot of coolant pipe options, and finding the right starting point took too long. The long lower pipe is GM 12635783 with a bung added for the overflow tank. The heater pipes are the ones that came on the engine, cut and rejoined with hose to clear it.

The supplied radiator mounts needed clearance holes just to accept the supplied radiator, which left them weak. I plated them, printed flexible bushings, made upper mounts, and later built a proper support that raises the radiator an inch and a half. A Derale PWM controller ramps the fans instead of slamming them on.

Upper and lower hoses from silicone and aluminium couplers
Beading a pipe end
The long lower coolant pipe
Upper radiator mounts with printed bushings
New lower support, with speed holes
Derale PWM fan controller
CHAPTER 08 · AUG 2018 – JUN 2019

Exhaust, twice

Version one was dual 2.5-inch tube into a Borla. Everyone called the sound exotic. It also destroyed two mufflers in a row, covered the back of the car in fibreglass after 800 miles, and boomed at part throttle.

For version two I re-made the headers in 2.25-inch and trailered the car to Solo Performance in Toronto. They added cats too. There's a little drone from 2,000 to 2,150 rpm and then it's gone.

“Here is something I haven't had in a long time: I can talk on the phone with earbuds while doing 80 mph, top up or down.”JUN 2019
Version two, by Solo Performance
Version one
What was left of the Borla
Cats this time
CHAPTER 09 · SEP 2018 – JUL 2019

Making it faster

In early September I was a second behind the people I usually beat. Some of that was a rusty driver, some was brake bias, a soft front bar and the throttle limit. I added a tuneable PCV valve and catch can, since these engines are known to clog the stock one.

The big step came from a full set of Good-Win Racing chassis braces. I welded studs to the V8R front subframe to take them, and a smear of carbon assembly paste stopped them shifting under load.

“They truly made a huge difference. I went from midpack in my class to getting top time of the day in my next three events.”JUL 2019
Braces on. They also now sit lower than the oil pan, which is no bad thing
Good-Win Racing brace kit going on
Tuneable PCV valve and catch can
Scale day
THE NUMBERS

Cost

Everything on the spreadsheet$13,434
Turbo NC take-offs sold− $8,500
Out of pocket$4,934

“If wasting $500 on wrong versions of parts will break you, walk away now.”

Weight

Turbo 2.02,550 lb
LFX, as finished2,660 lb
Winter target2,599 lb

Bars share one scale, 0 to 2,660 lb. The gain is split across engine, gearbox and diff.

WHAT I'D TELL THE NEXT BUILDER
  1. It is parts, not a kit.No packing slips, no instructions, no list of what else to buy. Plan on working out what arrived and making it fit.
  2. Run the ECU that matches the engine.Mine gave 60% throttle below 4,900 rpm until I did, despite internet advice to the contrary.
  3. Decide your compromises up front.I chose power steering over A/C, and no ABS over ABS that works 80% of the time. Others have since kept all three.
  4. Have the tools, time and temperament.With every part on hand and no rework, I'd do it again in a month or less.
  5. I would order most of these parts again.Copy what's here and you won't be lost in the woods the way I was.

Came out of this build

  • PART FILEVise jaws for AN hose ends
  • PART FILEBrake line clip and removal tool
  • PART FILEPlugs for the unused ABS sensor holes
  • PART FILEFlexible radiator bushings and battery cable grommet
  • SHOP NOTETube beader from an old pair of crimpers
  • SHOP NOTECarbon paste for slipping braces
  • SHOP NOTEWhat speed holes actually save: 15%
SINCE THEN
Finished. Autocrossed it hard a few days later, no problems, class win.
Third autocross, still trouble-free. Throttle limit found and fixed.
On the scales: 110 lb heavier than the turbo car.
New exhaust from Solo Performance. Phone calls at 80 mph are possible again.
Chassis braces on. Midpack to top time of day at the next three events.
Into a wall. Rebuild under way.
15,000 miles on the stock tune. Fuel trims and a proper tune still on the list.
ONE CAR, MANY LIVES
The whole car

This build was first posted as a thread on miata.net, where the questions and tips from other members shaped a lot of it. Read the original thread.